A white background with blue polka dots on it

    Water used to be just water, tap water to be precise, now you have so many different options! Let’s see if I can help you make sense of it!

    Roxane Melancon • Aug 16, 2019

    When I was growing up there was only one type of water that we drank, tap water!  We didn’t wonder if it was good or bad for you, that’s what we had. Of course, I remember that on special occasion my mother would buy some sparkling water or club soda but nothing like the options that we have today.

    I guess my first question would be, is our tap water safe to drink?  I have done some research and in Canada and specifically in the Toronto GTA areas, the tap water is safe to drink.  Tap water is regulated by Health Canada and the provinces and territories.  The guidelines for Canadian Drinking Water Quality spell out the maximum levels of potentially harmful substances that are allowed in drinking water.  Municipalities test their water sources constantly to make sure they are within these limits.

      Is Our Water Safe to Drink?

      Toronto test water samples every four to six hours and checks for more than 300 potential chemical contaminants¹.   The City of Vaughan, where I currently reside and have my wellness centre collect close to 2,000 microbiological samples each year, which is more than the 1,596 required by the Ministry. Samples are also analyzed for physical, chemical and inorganic parameters. The samples are representative of the entire distribution system and are collected across the city. ² So we should feel confident to drink our tap water.  But some people are still concerned; they don’t like the fact that we have hard water or that there is acceptable level of chlorine added or they just don’t like the taste, which is OK because we have other alternatives now.

      Let’s talk about all the different options we have:

      • Bottled
        • Filtered/Reverse Osmosis
        • Sparkling
        • Spring
      • Alkaline (Kangen)
      • Flavoured or Nutrient Added Water

      What are the differences and is there some pros and cons about them?

      Bottled water comes in different varieties:

      • Distilled
      • Purified
      • Spring

      Distilled water tends to be much cleaner than other types of water, with the distillation process being more effective than conventional filtration systems for water purification, it will remove all minerals and salt by the process of reverse osmosis and distillation. However, a negative factor regarding distilled water is the lack of healthy minerals typically found in other types of water, it can cause mineral deficiencies because it is devoid of all salts and most of the natural minerals in the water are gone as a result of this process. Drinking this water may cause a rapid sodium, potassium, chloride, and magnesium loss.

      Reverse osmosis or deionized water is where unwanted impurities are eliminated through the removal of mineral ions.   It is very similar to distilled water in that the nutrients that are beneficial to the body, like calcium are also removed during the purification process.  It would also be considered to have more acidity in it, which could exacerbate certain conditions like acid reflux or even digestive issues.

      Spring water  is the most recognizable type and you can find iteverywhere, like in your local convenience or grocery stores? There is a multitude of brands and what it means is that they claim that the source of the water is from an underground formation where the water naturally flows to the earth’s surface. Spring water like alkaline water may also contain more beneficial nutrients like calcium, potassium and fluoride, which would also affect the taste.

      Alkaline water is water that has a PH balance more than 7, what does that mean for us? Pure water/tap water is considered to have a PH of 7.   So, we understand what the difference is let’s define what PH is, it is a measure of acidity and alkalinity.   Lower number than 7 indicate increasing acidity and higher numbers would indicate increase alkalinity. Alkaline water is richer in alkaline base minerals such as Calcium, Magnesium, Potassium, Sodium and trace minerals such as Copper, Manganese, Iron and negative oxidation reduction potential. On a side note, here is a little known fact for people that wonder what Kangen water is, it’s alkaline water, it is a brand name that was created by the manufacturer of the water system; Enagic Corporation®, nothing else!  If you are looking for an Ionizer water system, there is a lot of options out there that are as reliable and more affordable than Kangen, but that would be another topic by itself!

      Now the latest fad, flavoured or nutrient-added water . It’s appealing for giving plain, bottled water a little taste plus some added vitamins and minerals, just be careful and read the nutrition content/label carefully as some of them may have more sugar content than pop and be wary as it contains calories.

      What do I do with all this information? Was it helpful?

      I hope so, but at the end of the day, here are my thoughts on the subject? We need water to live, main focus is to make sure that you stay hydrated and to ensure you drink enough water on a regular basis, now the amount of water you need will vary by individuals and will also depend on your eating habits. Choosing tap, bottled, filtered, alkaline, reverse osmosis, Kangen, flavored or nutrient-added water is a matter of beliefs, taste, convenience and price, not necessarily health related. While you may have a preference for which type of water is best, generally, there’s no one type that promises greater health benefits than the others. So long as you drink clean and safe water, regular amount, not in excess of one type vs. another you will be fine!
      SPECIAL OFFERS

      Immune Booster Package
      Rejuvenation Facial Package
      06 Apr, 2024
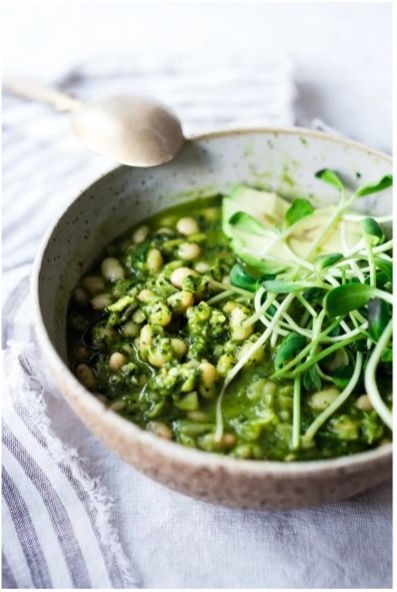
      Cassoulet Vert A modernized White Bean Stew enlivened with Lemony Kale Pesto that is meat-free and that can be made in an Instant Pot! Fast, healthy delicious! INGREDIENTS: 3 x 14-ounce cans White Beans ( 4 ½ cups cooked), drained (or scroll down for Instant Pot Dry beans) 2 tablespoons olive oil 1 onion, diced 4 garlic cloves, rough chopped 1 cup veggie broth or chicken stock 1 teaspoon salt pepper to taste 1 teaspoon dried herbs de Provence (or sub dried thyme or rosemary) Lemony Kale “Pesto” 2 cups of kale, packed (about 1 small bunch, stems removed) ½ bunch Italian parsley or basil (about 1 cup packed, thins stems ok) or a combo of both 2 cloves garlic zest and juice from one medium lemon! ¼ cup nuts (optional) - like toasted sliced almonds, cashews, toasted pinenuts, smoked almonds are nice too (or leave them out) ¼ cup olive oil ¼ cup water (or more, just to get this into a thick “paste”) 1 teaspoon salt Garlicky Bread Crumbs or Croutons (or store bought, saves time!) 1–2 slices bread, torn into little pieces 2–3 tablespoons olive oil 1–2 garlic cloves, smashed pinch of salt Garlicky Bread Crumbs or Croutons (or store bought, saves time!) 1–2 slices bread, torn into little pieces 2–3 tablespoons olive oil 1–2 garlic cloves, smashed pinch of salt Garnish: garlicky breadcrumbs, shaved pecorino cheese or parmesan, or try a soft poached egg, avocado, or crumbled goat cheese. INSTRUCTIONS: Stove top: In a large pot or Dutch oven, heat the oil, over medium high heat. Add the onion and garlic, stirring for 3-4 minus until fragrant. Lower heat to medium and sauté for 3-4 more minutes. Add the beans, broth, dried herbs and bring to a gentle simmer. Season with salt and pepper. Cover and set heat to low heat. Make Lemony Kale Pesto. Place the Kale, parsley, and garlic in a food processor. Pulse until chopped. Add the remaining ingredients- zest, lemon juice, oil, water, salt, nuts ( if using). Pulse until well combined but not too smooth. Scrape down sides, pulse again. Make the garlicky breadcrumbs: Heat oil in a skillet over medium heat. Swirl the smashed garlic in the oil infusing it, until the garlic is deeply golden and fragrant, season the oil with salt. Remove the garlic. Add fresh torn bread to the skillet and fry until golden and crispy, stirring. Set it aside. Add the lemony kale pesto to the warm beans, gently incorporating. To loosen add more broth to get a stew consistency. You don’t want this to be too soupy, or too dry. In between. Let this warm up but don’t cook too long or you’ll lose the lovely colour. Taste for salt and lemon. I typically add both. If it’s bland- it needs both. You want this lemony and slightly salty! Serve with garlicky croutons, and a sprinkle of pecorino cheese. Or add avocado, a poached egg, crumbled goat cheese. This simple base recipe can be repurposed into other dishes during the week. Pan-sear a piece of fish or chicken and serve it over top, or let the beans be the base of your next buddha bowl. Have some for breakfast with an egg and toast. Turn it into bruschetta. Toss the cold beans into a salad. You get the idea. BON APPETIT!
      01 Feb, 2024
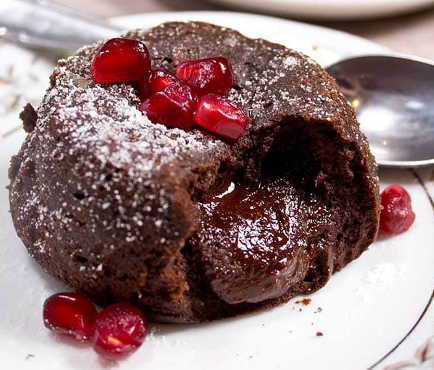
      Keto Chocolate Lava Cake - Only 5 Ingredients! This keto lava cake has a deliciously decadent gooey molten chocolate centre. A quick keto dessert with only 5 ingredients! Your friends and family won't believe this delicious recipe is gluten free, low carb and sugar free and contains only 2.8g net carbs per portion. PREP TIME: 5 Mins COOK TIME: 9 Mins TOTAL TIME: 14 Mins SERVINGS: 2 CALORIES: 460 kcal INGREDIENTS: 2 oz unsweetened chocolate (55g), at least 85% cocoa solids 1 tablespoon super-fine almond flour ***see notes. 2 oz butter unsalted, plus more for greasing ramekins 2 eggs 3.5 tablespoon powdered sweetener or more, depending on the chocolate you use INSTRUCTIONS: Heat oven to 175 Celsius/350 Fahrenheit. Grease 2 ramekins with butter. Melt the chocolate and butter and stir to combine. Beat your eggs well - best with a mixer. Add to the chocolate/butter mix together with almond flour and sweetener and stir. You'll get a dough-like consistency that is pourable. Pour into 2 ramekins. Bake 9 minutes until the top is set but still jiggly. Do not over-bake! Turnout onto plates and serve with a dusting of powdered sweetener and pomegranate seeds or a couple of raspberries. A mint leaf would round off the look nicely! NOTES: Net carbs: 2.8g per portion. If you're using coarse almond flour or ground almonds, increase the amount to 1 ½ tbsp. Chocolate: Use the best quality you can get hold of, with a cocoa solids amount of at least 85%. I used 100% unsweetened chocolate, so added 3 ½ tablespoon sweetener. If you use 90% chocolate, 2 tablespoon sweetener works well. If your chocolate already contains sweetener, adjust accordingly. If you're in the US, Lily's is always a good option. The nutrition info is calculated using unsweetened chocolate. If you used 90% chocolate, the amount of net carbs increases to 4.7 per portion. If you want to turn your cakes out, grease your ramekins REALLY WELL! If you are only after the taste, there's no stress - just serve in the ramekins. My ramekins measured 2 inch at the bottom and 3 at the top. If you want to make 1 larger portion, you might need to increase the time in the oven by 2-3 minutes. Do not over-bake! The top needs to be set, but jiggly. My first round of cakes baked for 12 minutes and they were firm in the middle. Don't deprive yourself of that gooey centre! These cakes are best eaten straight out of the oven! If you leave them in the ramekins for long, they will continue to cook and set more than you might like HAPPY VALENTINE!
      01 Feb, 2024
      In my world, every day is love day …. but it’s almost February and we are entering into the commercial love month, and soooooo many of us are getting triggered. Many of my clients are starting to feel the pull…for some it’s even worse than the stress of the Christmas / Hanukkah season. ● If you’re in a relationship and it’s not going well, you’re gonna get triggered. ● If you’re not in a relationship and you want one, you’re gonna get triggered. ● If your relationship has recently ended, you’re gonna get triggered.
      By Roxane Melançon 23 Jan, 2024
      COMPLIMENTARY MEDITATION GUIDE
      By Roxane Melançon 23 Jan, 2024
      INTENTION – AFFIRMATION – MANIFESTATION
      31 Oct, 2023
      Healthy Nutrition I don’t know about you, but my days fly by and taking time to nurture my body, more so my cells, with the right nutrients can be challenging, your day-to-day activities take over and next thing you know you’ve skipped a meal! Morning routine for some is very hectic, getting your kids ready for school, leaving early for work because you have a long commute, taking the time for your self to have a good healthy breakfast takes a back seat! Introducing Foodicyn! Juice on Another Level Foodicyn has changed the BREAKFAST RULES! The focus is on the five principles of Alkaline, Fibre, Vitamins, Minerals and Enzymes in a fun, new exciting, abundant, and tasty way are helping to bring the human body back to life. The tried, tested and true daily nourishing routine helps you break old habits that no longer serve you and allow you to honour your CELLf each and every morning. In doing so, you awaken and nourish your dormant cells. In return, inflammation settles down and you just start to feel better from within…ahhhhh! The goal at Foodicyn is to make Health SECCE. That’s Simple, Educational, Convenient and Cost Effective because after all being a healthy human being should never have been so difficult in the first place. So, if you’re sick and tired of always feeling sick and tired, why not give it a try and nourish your CELLF like never before.
      11 Oct, 2023
      Aging is a natural process of life, as far as we can remember, people have been fascinated and searching for a miracle fountain of youth! We are all too familiar with mainstream anti-aging treatments that are being offered nowadays! Botox (Botulinum Toxin Therapy) Dermal Fillers Cosmetic Plastic Surgery Chemical Peels Rhytidectomy Microdermabrasion 1000’s of Anti-Aging Cosmetic Products with Retinol/Retinoid on the market
      pumpkin pie
      11 Oct, 2023
      Vegan - Gluten Free Pumpkin Pie THE BEST Pumpkin Pie that requires just 10 ingredients and is both vegan and gluten-free! Crisp crust, flavourful pumpkin center — the perfect pumpkin pie for your holiday meals. CRUST INGREDIENTS: 1¼ cup Bob’s Red Mill 1:1 Gluten-Free Flour* ¼ teaspoon salt 6 tablespoons cold vegan butter 4-6 tablespoons ice cold water FILLING INGREDIENTS: 2 ¾ cups pumpkin puree (1 ½ 15-ounce cans yield 2 ¾ cups) ¼ cup cup maple syrup ¼ cup cup brown sugar 1/3 cup unsweetened plain almond milk 1 tablespoon olive oil (or melted coconut oil) 2 ½ Tbsp cornstarch or arrowroot powder 1 ¾ teaspoon pumpkin pie spice (or sub mix of ginger, cinnamon, nutmeg & cloves) ¼ teaspoon sea salt FOR SERVING (OPTIONAL): Coconut Whipped Cream Vegan Pumpkin Pie Ice Cream PREPARATION: To prepare crust, add gluten-free flour and salt to a large mixing bowl and whisk to combine. Slice or dollop the cold butter in and work gently with a fork or pastry cutter to cut it in. Don’t overwork, just get it incorporated. Next add ice cold water a little at a time and use a wooden spoon to stir. Only add as much water as you need to help it come together (don't add more than 6 tablespoons). Once a crumbly dough is formed, transfer to a piece of plastic wrap (or parchment paper) and work gently with your hands to form a 1/2-inch-thick disc. Wrap firmly and refrigerate for a minimum 30 minutes, up to 2 days. Just let it warm back up a little before using. You don’t want it too warm, or it can get too soft to handle. Once your dough is chilled, preheat oven to 350 degrees F (176 C) and prepare pie filling. Add all pie filling ingredients to a blender and blend until smooth, scraping down sides as needed. Taste and adjust seasonings as needed. Set aside. To roll out the crust, unwrap the disc and place it between two sizable layers of parchment or wax paper (plastic wrap will work OK, but is a little more difficult to work with). Use a rolling pin to gently roll it into the shape of your pie pan (we recommend a standard 9-inch pan). If it cracks, don’t stress – you can reform it with your hands once you get it in the pan. But try and be gentle. To transfer the crust, remove the top layer of wax paper and gently lay the pie dish face down on top of the crust and use the support of the wax paper to invert it quickly but carefully. Don’t overthink it – just do it. Once you get the crust inverted, gently use your hands to form it into the pan, working the crust up along the sides. It can be a little tricky, but it bakes beautifully, so it’s worth the effort! Just try not to overwork the dough in the process – it shouldn’t take more than a few minutes to perfect the shape. Any holes or cracks can be mended with a little excess dough and the heat of your hand. TIP: I would advise against trying to be fancy and do any elaborate design with the crust, so just get the crust in, get a flat edge and go. Pour filling into pie crust and bake for 58-65 minutes. The crust should be light golden brown, and the filling will still be just a bit jiggly and have some cracks on the top. Remove from oven and let cool completely before loosely covering and transferring to the refrigerator to fully set for 4-6 hours, preferably overnight. Slice and serve with coconut whipped cream and an additional sprinkle of cinnamon, nutmeg, and/or pumpkin pie spice (optional). This would also be amazing with my Vegan Pumpkin Pie Ice Cream and Brown Sugar Pecans. Source: Vegan Gluten-Free Pumpkin Pie | Minimalist Baker Recipes HAPPY THANKSGIVING FROM OUR LOVING HEALTH ENERGIES VAUGHAN FAMILY TO YOURS!
      More Posts
      Share by: